


Rapid prototyping helps engineering teams turn digital designs into physical models faster. It gives designers a practical way to test form, fit, function and usability before moving into full production.
This process is especially useful when teams need to reduce development risk, speed up product iterations and validate design decisions earlier. Instead of waiting until late-stage manufacturing to identify problems, rapid prototyping helps teams find issues while changes are still easier to make.
For medical, therapeutic and advanced lighting applications, prototype and testing can help teams evaluate light delivery, usability, mechanical fit and product performance before manufacturing.
What is Rapid Prototyping?
Rapid prototyping is a group of techniques used to create a physical model of a part, product or assembly from digital design data. Engineers often start with a 3D CAD model, then use prototyping technology to create a model that can be reviewed, tested and improved.
The main goal is to evaluate an engineering design before full-scale production. This can include checking the product’s shape, size, fit, function, material behavior or user interaction.
Rapid prototyping helps teams move from idea to physical model faster. It supports faster feedback, better design decisions and more efficient product development.
In simple terms, rapid prototyping gives engineers a faster way to build, test and refine product ideas.
Don't have time to read the entire post right now? Get the free PDF
Get the PDF version to save to your desktop and read it when it's convenient for you.
(No email required):

How Does Rapid Prototyping Work?
Rapid prototyping usually starts with a digital model created in computer-aided design software. Once the design is ready, the file is converted into a format that prototyping equipment can read, often an STL file.
The machine then builds the prototype based on the chosen process. Many rapid prototyping methods build parts layer by layer, although not every method works the same way.
A typical rapid prototyping process follows this sequence:
- Create a 3D CAD model.
- Convert the model into a prototyping-ready file.
- Select the right prototyping method and material.
- Build the physical prototype.
- Test the prototype for form, fit, function or usability.
- Review the results with the engineering team.
- Refine the design and repeat as needed.
This repeatable cycle helps teams identify problems early and improve the product before investing in tooling or full manufacturing.
Rapid Prototyping and Engineering Product Design
Prototypes are a key part of engineering product design. They help teams reduce uncertainty by turning an idea into something that can be seen, touched and tested.
A prototype can help answer practical design questions. Does the part fit into the assembly? Is the shape comfortable to use? Does the product perform as expected? Does the design create unexpected issues during handling or operation?
Rapid prototyping is valuable because it brings these answers into the development process earlier. This can reduce wasted time and prevent costly changes later.
For complex products, especially medical and lighting systems, early testing can help teams evaluate performance, usability and integration before production decisions are finalized.
Rapid Prototyping vs 3D Printing
The terms rapid prototyping, 3D printing and additive manufacturing are often used together. They are related, but they do not mean exactly the same thing.
Rapid prototyping describes the purpose: creating a prototype quickly for testing, review or validation. 3D printing and additive manufacturing describe processes that may be used to create the prototype.
In other words, 3D printing can be one method used within rapid prototyping. Rapid prototyping is the broader product development activity.
This distinction matters because not all prototypes are made with the same process. Some may use 3D printing, while others may use machining, molding or other manufacturing methods depending on the design need.
source: Selecting a Rapid Prototyping Process | White Paper https://www.protolabs.com/resources/white-papers/rapid-prototyping-processes/
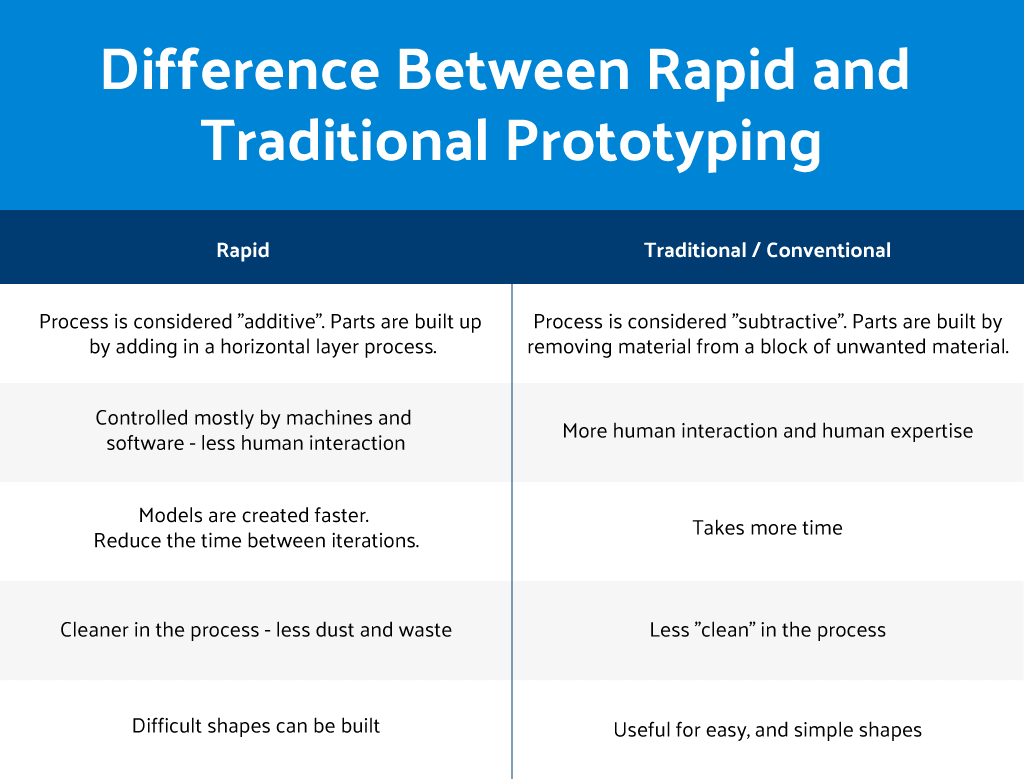
Traditional Prototyping vs Rapid Prototyping
Traditional prototyping can require longer setup times, more manual work and higher upfront costs. It may involve tooling, machining or processes that take more time before a usable model is available.
Rapid prototyping is designed to shorten that timeline. It helps teams move from CAD model to physical model faster, which supports quicker design reviews and more frequent iteration.
The biggest difference is speed and flexibility. Traditional prototyping may still be useful for certain applications, but rapid prototyping is often better when teams need to test ideas quickly and make changes often.
For engineering teams working under tight product development timelines, rapid prototyping can support faster decisions without waiting for a full production process.
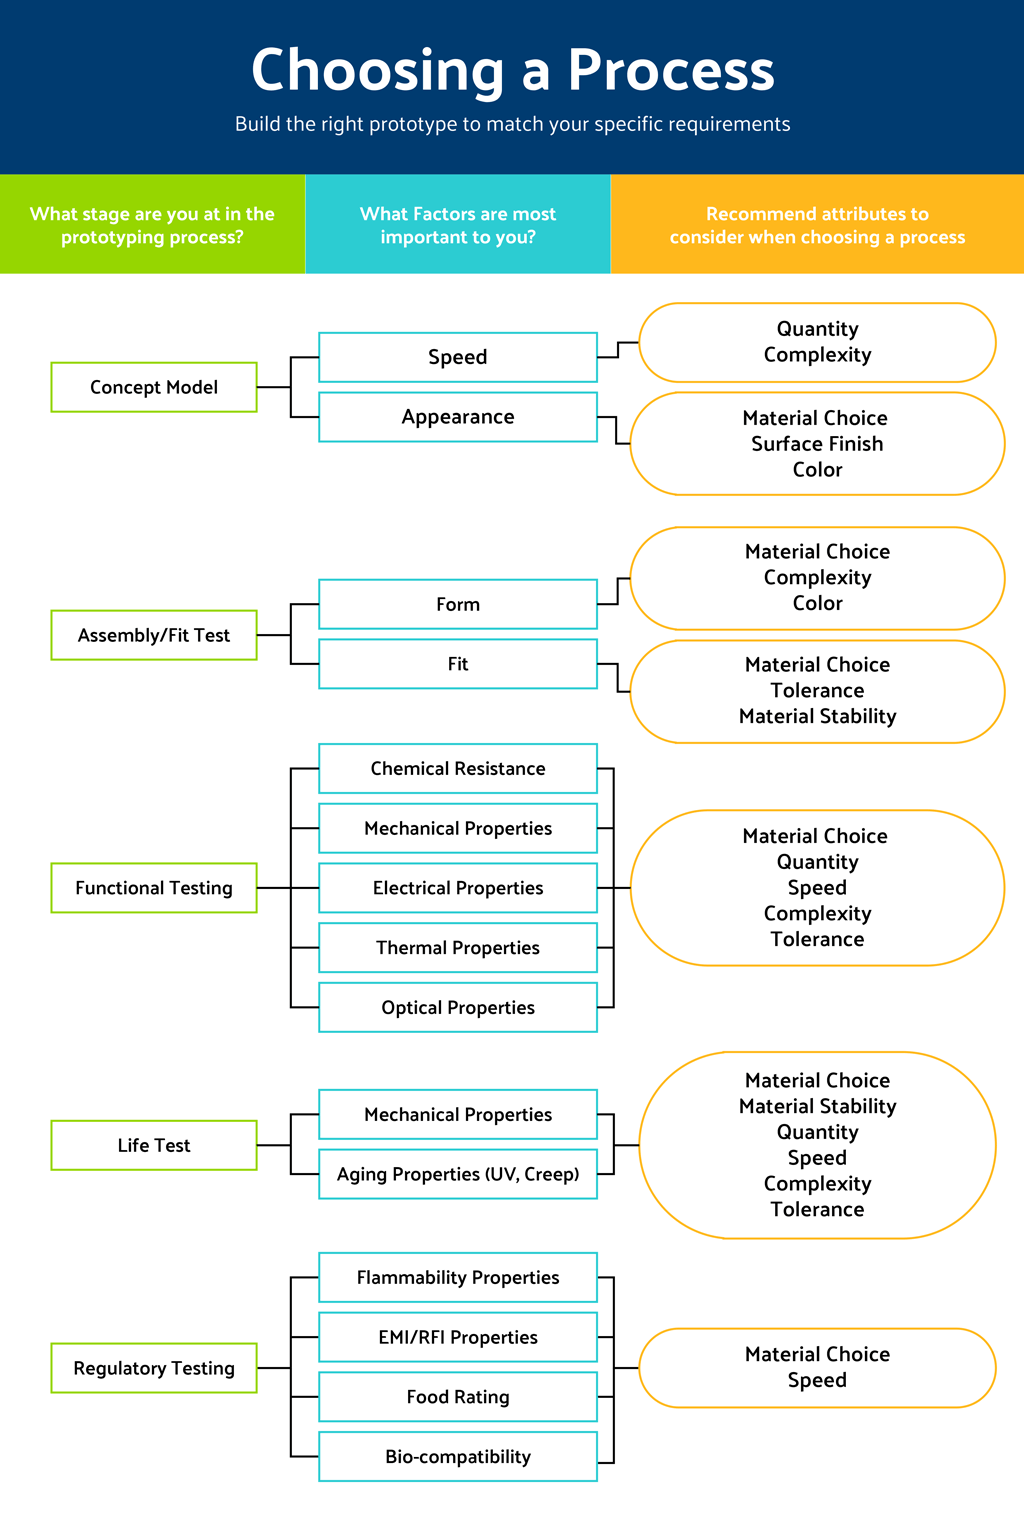
How to Select a Rapid Prototyping Process
Selecting the right rapid prototyping process depends on what the team needs to test. A prototype built only for visual review may not need the same strength, material or finish as a prototype used for functional testing.
Before choosing a process, engineering teams should review these factors:
- Prototype purpose
- Material requirements
- Strength and flexibility needs
- Surface finish expectations
- Part size and geometry
- Dimensional accuracy
- Heat or chemical resistance
- Timeline and budget
- Testing environment
- Production intent
These factors help determine whether the prototype should be a quick visual model, a fit-check model or a functional test part.

The steps can vary depending on your project but for the most part includes:
- Define/Clarify
- Plan
- Design
- Build a prototype
- Test
- Iterate
- Redesign
It is a process that can be applied to any problem. Rapid prototyping fits into step 4 - "Build a prototype".
To break it down further, RP would look similar to this image:
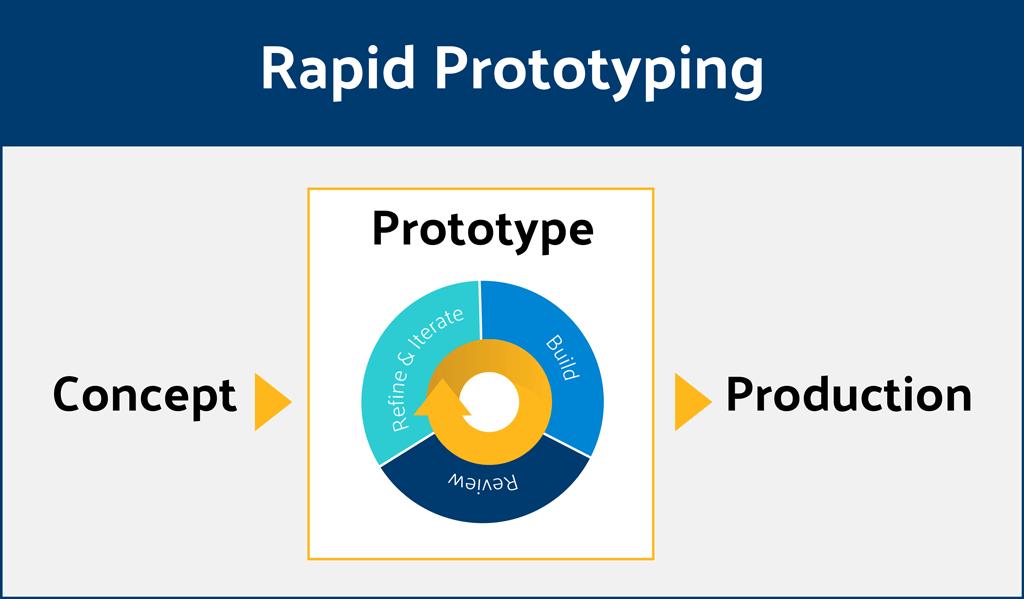
source: What is Rapid Prototyping & Its Techniques http://engineeringproductdesign.com/knowledge-base/rapid-prototyping-techniques/
Common Rapid Prototyping Methods
Different rapid prototyping methods support different applications. The best choice depends on part geometry, material needs, timeline, cost and testing requirements.
1. Stereolithography
Stereolithography, often called SLA, uses a light source to cure liquid resin layer by layer into a solid part. It is often used when teams need high detail and smooth surface finish.
SLA can be useful for visual models, design reviews and parts where fine features matter.
2. Laser Sintering
Laser sintering uses a laser to fuse powdered plastic material into a solid part. Nylon and polyamide materials are commonly used in this process.
This method can support durable prototypes with complex geometry. It may be useful when teams need a stronger prototype for functional review.
3. Direct Metal Laser Sintering
Direct metal laser sintering, often called DMLS, uses laser energy to create metal parts from powdered metal material. It can produce complex metal geometries that may be difficult with traditional manufacturing.
DMLS may be useful when teams need metal prototypes for strength, durability or performance testing.
4. Fused Deposition Modeling
Fused deposition modeling, often called FDM, uses heated thermoplastic filament to build a part layer by layer. It is one of the most widely used 3D printing methods.
FDM is often useful for early models, fit checks and functional prototypes where speed and cost matter.
5. Multi Jet Fusion
Multi Jet Fusion creates functional nylon prototypes and production parts with strong detail and relatively fast turnaround. It can support durable parts for testing and short-run production needs.
This method may be useful when teams need strength, repeatability and speed.
6. Injection Molding
Injection molding uses heat and pressure to inject molten plastic into a mold. Once cooled, the part becomes solid.
Although injection molding is often associated with production, it can also support prototype and bridge manufacturing needs when teams need parts closer to final production behavior.
How Rapid Prototyping Fits the Design Process
The engineering design process usually starts with a problem and ends with a tested solution. Rapid prototyping fits into this process by helping teams build and test ideas before final production.
A common engineering design process includes:
- Define the problem.
- Clarify the requirements.
- Plan the design approach.
- Create the design.
- Build a prototype.
- Test the prototype.
- Review results.
- Iterate the design.
- Redesign as needed.
- Prepare for manufacturing.
Rapid prototyping is most closely tied to the build, test and iterate stages. It helps engineers move through those stages faster by making physical prototypes available sooner.
This is important because product development rarely moves in a perfectly straight line. A prototype may reveal a fit issue, usability concern or performance gap that requires design changes.
Stages of Rapid Prototyping
Rapid prototyping can happen at multiple points in the product development process. Each stage answers a different type of design question.
1. Concept Prototype
A concept prototype helps the team understand the early idea. It may not be fully functional, but it helps stakeholders review size, shape, layout or general appearance.
This stage is useful for early feedback before the design becomes too detailed.
2. Form and Fit Prototype
A form and fit prototype helps confirm whether the part has the right size, geometry and assembly relationship. It can show whether the product fits into its intended housing, system or workflow.
This stage is useful for identifying mechanical or spatial problems.
3. Functional Prototype
A functional prototype helps test how the product performs. It may be used to evaluate movement, light output, user interaction, durability or other performance needs.
This stage is important when the team needs evidence that the design can work in real conditions.
4. Usability Prototype
A usability prototype helps evaluate how people interact with the product. It can reveal whether controls, shapes, indicators or interface features are easy to understand.
This stage is especially important for medical devices, where usability can affect workflow and user confidence.
5. Pre-Production Prototype
A pre-production prototype is closer to the final product. It may use more accurate materials, finishes and manufacturing methods.
This stage helps teams validate the design before moving into full manufacturing.
7 Benefits of Rapid Prototyping
Rapid prototyping can help engineering teams make better decisions earlier in the development cycle. It gives teams a faster way to test assumptions, improve designs and reduce late-stage risk.
1. Better Design Visualization
Rapid prototyping allows designers, engineers and stakeholders to see a physical version of the product. This makes it easier to understand shape, size and overall design intent.
A tangible model can reveal issues that may not be obvious in a digital file. It also helps teams discuss improvements with more clarity.
2. Faster Product Development
Rapid prototyping can reduce the time between design iterations. Teams can create, test and revise prototypes faster than many traditional methods allow.
This faster cycle supports shorter development timelines and can help products move toward market more efficiently.
3. Lower Development Costs
Finding design problems late in the process can be expensive. Rapid prototyping helps teams identify issues earlier, when changes are usually easier and less costly.
It can also reduce waste by limiting unnecessary tooling, rework or production changes.
4. More Design Flexibility
Rapid prototyping supports quick changes to shape, size, materials and features. Engineers can test multiple versions before selecting a final direction.
This flexibility is helpful when a product must meet specific performance, usability or integration requirements.
5. Earlier Error Detection
A prototype can reveal design flaws, fit issues, structural weaknesses or usability problems before production begins. This makes it easier to correct issues before they become larger risks.
Early error detection is one of the strongest reasons to use rapid prototyping in engineering product design.
6. Functional and Performance Testing
Rapid prototyping can support real-world testing of function, ergonomics and performance. Depending on the method and material, a prototype may be used to evaluate how the product behaves under expected conditions.
For lighting systems, this may include testing light output, uniformity, heat behavior, mechanical fit or user interaction.
7. Better Usability Feedback
Rapid prototyping helps teams understand how users interact with a product. This can reveal whether the design feels intuitive, comfortable and practical.
For medical products, usability feedback can be especially important because users often work in demanding environments where clarity and ease of use matter.
Rapid Prototyping for Medical Lighting Systems
Rapid prototyping is especially useful for medical lighting and advanced illumination products. These systems often need to balance optical performance, mechanical fit, thermal behavior and usability.
A prototype can help teams evaluate how light moves through the device, whether the product fits the intended application and how users interact with the design.
This can be important for surgical lighting, medical HMI backlighting, light therapy devices and diagnostic tools. Each application may require a different prototype strategy based on optical output, size, placement and performance expectations.
Lumitex supports the design, development and manufacturing of advanced lighting systems for medical, therapeutic and technical applications. Ourcustom lighting solutions help teams develop products where light delivery, precision and usability are central to performance.
Conclusion
Rapid prototyping helps engineering teams move faster without skipping important design validation. It gives teams a way to test product ideas, evaluate performance and refine designs before full manufacturing.
This process can reduce risk, improve usability and support better product decisions. It is most valuable when teams use it early enough to guide design changes before production costs become harder to control.
For advanced lighting systems, rapid prototyping can help teams evaluate optical behavior, mechanical fit, interface usability and manufacturing readiness.
If your team needs support with a lighting product or medical device concept, talk to an expert about how Lumitex can help move your design forward.
Frequently Asked Questions
What Is Rapid Prototyping?
Rapid prototyping is a product development process used to create physical models from digital design data. It helps engineers test form, fit, function and usability before moving into full production.
How Does Rapid Prototyping Help Product Design?
Rapid prototyping helps product design by giving teams a physical model they can review, test and improve. This supports faster feedback and better design decisions.
What Is the Difference Between Rapid Prototyping and 3D Printing?
Rapid prototyping is the purpose of creating a quick prototype for testing or validation. 3D printing is one process that can be used to create that prototype.
What Are the Main Rapid Prototyping Methods?
Common rapid prototyping methods include stereolithography, laser sintering, direct metal laser sintering, fused deposition modeling, Multi Jet Fusion and injection molding.
Why Is Rapid Prototyping Important in Engineering?
Rapid prototyping is important in engineering because it helps teams identify design issues early. It can reduce risk, shorten iteration cycles and improve product performance before manufacturing.
What Industries Benefit From Rapid Prototyping?
Rapid prototyping is used in healthcare, automotive, aerospace, consumer electronics, architecture and advanced manufacturing. It is especially useful in industries that need precision, customization and faster development.
How Does Material Choice Affect Rapid Prototyping?
Material choice affects strength, flexibility, heat resistance, surface finish and testing accuracy. A visual prototype may need a different material than a functional or mechanical prototype.
What Are Common Challenges in Rapid Prototyping?
Common challenges include material limitations, surface finish issues, build size constraints and the need to optimize CAD files for the selected prototyping process.

Comments